Harmonize your data
Run QCV harmonizer (What is it?) for creating the harmonized in format and vocabulary input data file(s) by following these instructions :
Click on Tools just below Upload on the Galaxy action list vertical panel on the left (see
ain the Figure 1) . A new vertical panel called Tools appears next to the Galaxy action list vertical panel.Search
QCV harmonizerin the top search bar (Figure 1)Select the tool. Its parametrization page appears on the center (Figure 1)
In the blue box and below Input the Netcdf data files (Figure 1)
for a dataset collection such as 4903881,
Select {Dataset collection} then click on Select Value. A window with files listed in your history opens.
Select 4903881
for WOA,
Select {Single dataset}
Then click on Select Value. A window with files listed in your history opens.
Select woa###.nc file
Run the tool by clicking on the corresponding button below (see
bin the Figure 1).
Once the QCV harmonizer outputs are ready, the harmonized file is available in the history section (green color)

Figure 1:Q.C.V harmonizer tool on Galaxy
Qualify your data
Step1 : Creation of the ODV collection
Run ODV collection manager (What is it?) for creating Ocean Data View (ODV) spreadsheet collection and qualifying the dataset. Please, follow the instructions :
Click on Tools just below Upload on the Galaxy action list vertical panel on the left (see
ain the Figure 2). A new vertical panel appears.Search
ODV collection managerin the top search bar (Figure 2)Select the tool. Its parametrization page appears on the center (Figure 2)
For Input raw data,
Select {Multiple Datasets}, then click on Select Value (Figure 2)
A window with files listed in your history opens
Select 4903881_harm.nc
Add reference datasets (optional)
It is possible to add a reference dataset as WOA in the ODV collection spreadsheet for comparison. For that, add the harmonized reference data file in the section Input reference data (see “b” in the Figure 2).
For big file, a subsetting is possible. Please report to the tool details or just below.
(optional) It is possible to change the ODV collection manager default parametrization by selecting Yes, I to write my own configuration file at the question Select if you want to write your own configuration file or not (see
cin the Figure 2) :operator name = Enter your name
QC convention for the output file = Select one QC flag scale understanding by ODV
Subsetting = 1 (yes it is), 0 (no), -1 (for float crossing 180°E/W)
plt = 0 (no plot), 1( yes)
Run the tool by clicking on the corresponding button below (see
don Figure 2).
Once the ODV collection manager outputs are ready, files are available in the history section (green color) (Figure 2) through :
the galaxy collection ODV tool collection (include all outputs)
the galaxy file ODV collection manager output (= odv_collection.txt)

Figure 2:ODV collection manager tool on Galaxy
Step 2 : Launch ODV automatically
For launching ODV interactive tool automatically, follow the instructions :
Click on Tools just below Upload (see
ain the Figure 3) or Interactive Tools just above (seebin the Figure 3) in the Galaxy action list vertical panel on the left. A new vertical panel appears.Search ODV interactive tool in the top search bar (Figure 3)
Select the tool. Its parametrization page appears on the center (Figure 3)
At the question Do you want your data to be automatically load when ODV is launched? (see
cin the Figure 3), answer Yes, I want my data to be loaded directly. This is useful to open directly the odv collection, and with a specific view if this last one is available.At the question Netcdf or tabular text file. For text file, odv format is recommanded (see
din the Figure 3),select {Dataset collection}, then ODV collection manager output
or select {single dataset}, drag and drog odv_collection.txt from odv tool collection available in the history section
At the question Do you have a view? (see
ein the Figure 3), answer Yes, I have my own view. A Data view selection panel appears (seefin the Figure 3).Click on ODV tool collection in the history section
Drag and Drop qualification_startingPoint_nitrate.xview in the Data view panel
Run the tool (see
gin the Figure 3)

Figure 3:Parametrisation of ODV interactive tool on Galaxy
When the ODV interactive tool is ready,
Open odv interactive tool
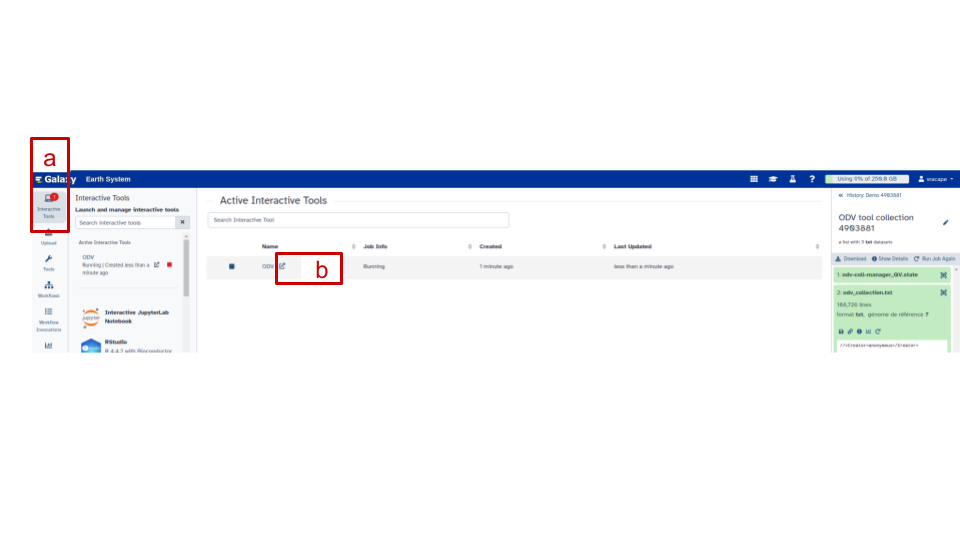
Figure 4:How to launch ODV interactive tool on Galaxy

Figure 5:Default view when performing called qualification_startingPoint_nitrate.xview creating by ODV collection manager
ODV is open with its home page!!!!
Read me for opening your collection
ODV is open with map view!!!!
Read me for reload the qualification view
Step3 : Qualify the dataset with ODV
Many useful information are available the How to use ODV section
Step4 : Export history once qualification is finished.
To export history information,
Click on the top left Export > History
The Export station history opens, with a default name history_from_odv_collection.txt with our example;
Go to working/Documents/ODV/galaxy/outputs
Save > OK > OK
close ODV by clicking on top left File > exit
Once the ODV interactive tool closed, the 3 potential odv outputs are now available (green color) in the History section (Figure 3). Only 2 are useful for the next steps:
The galaxy collection ODV all outputs that includes :
data_odv_collection.zip (all odv output files in a zip)
history_from_odv_collection.txt
odv_collection.odv
odv_collection.txt (creating with odv collection manager)
The file ODV history extracted with the history txt files (same as history_from_odv_collection.txt).
Step5 : (optional) Report QC & Data changes
For reporting your QC flags & data changes into the harmonized dataset before calibrating the nitrate sensor, run ODV history manager tool (What is it?). For that, please :
Click on Tools just below Upload on the vertical panel Galaxy action list on the left (see
ain the Figure 6). A new vertical panel appears.Search
ODV history managerin the top search bar (Figure 6)Select the tool. Its configuration page appears on the center (Figure 6)
Please below, select the odv collection spreadsheet open with ODV to have futher instructions
In Tool Parameters section (see
b,c,din the Figure 6):Input NetCDF data : Select the harmonized NetCDF file(s) ###_harm.nc created by
Q.C.V harmonizerInput history text file : Select ODV history extracted txt file extracted from ODV after changes by step 4
Input ODV file : Select ODV collection manager output, the ODV spreadsheet txt collection created by
ODV collection managerand visualize with ODV for QC changes
In Tool Parameters section (see
b,c,din the Figure 6):Input NetCDF data : Select the harmonized NetCDF file(s) ###_harm.nc created by
Q.C.V harmonizerInput history text file : Select history_from_odv_collection.txt txt file from ODV all output extracted from ODV after changes by step 4
Input ODV file : Select odv_collection.txt from ODV tool collection, the ODV spreadsheet txt collection created by
ODV collection managerand visualize with ODV for QC changes
(optional) It is possible to change the Default parametrization by selecting Yes, I to write my own configuration file for the question Select if you want your own configuration file (see
ein the Figure 6) :QC convention for the ODV output file = Select one QC flag scale understanding by ODV
ODV edits to be reported:
EDITFLAGS (report QC changes from the history to the data collection)
EDITDATA (report data changes from the history to the data collection).
Run the tool by clicking on the corresponding button below (see
fin the Figure 6).
At the end of the process, the tool outputs are distributed by Galaxy in 3 collections :
One for NetCDF files, called ODV history manager netcdf collection
One for csv files, called ODV history manager csv collection
One for log files, called ODV history manager log files
All of these are now available (green color) in the History section (Figure 6) and ready for running the Biogechemical Calibration tool but before,
Check the tool logs (YYYY-MM-DDTHHMM_galaxy_odv-history-manager_history) to be sure that everythink is reported in the extended harmonized file by clicking on the “eye” icon on the right of the file. If you encounter issues, make sure you respect the file name conventions at step 4. If you still don’t find why it does not work, send an email to the contact point.
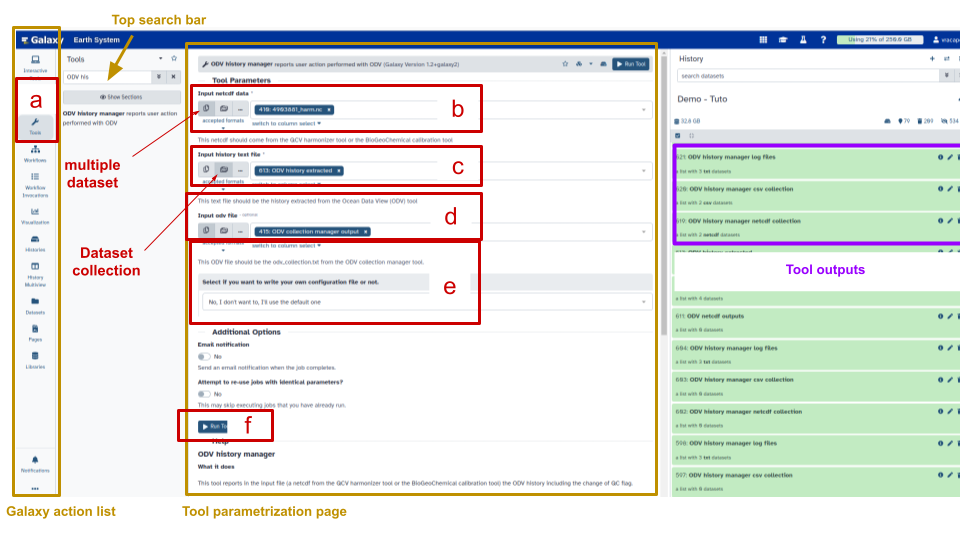
Figure 6:ODV history manager parametrization
Calibrate your data
Nitrate
Run Biogeochemical calibration (What is it?) for calibrating the nitrate sensor by following these instructions :
Click on Tools just below Upload on the vertical panel on the left of Galaxy action list vertical panel on the left (see
ain the Figure 7). A new vertical panel appears.Search
Biogeochemical calibrationin the top search bar (Figure 7)Select the tool. Its parametrization page appears on the center (Figure 7)
In Tool Parameters section, select for each input (see
bin the Figure 7):Input harmonized netcdf data: Select the 4903881 harmonized NetCDF file(s) with QC report, named ###_harm_qced.nc. The selection is easier by clicking on the 3 dots {Browse or Upload datasets}
Input reference data : (optional) Select woa_###_harm.nc if you want to estimate the reference nitrate from climatology (see for getting it)
(optional) Change the default QC flag configuration (see
din the Figure 7), if :you work with platforms that do not follow the argo flag scale convention
you want to fix adjusted value at QC flag 2 (potentially good)
(optional) Change the default calibration method parametrization or add new parametrizations for comparison. For that, at the question Select if you want to write your own configuration file or not (see
ein the Figure 7) , answer Yes, I want to write my own configuration file.Change the first configuration if needed
Click on the Insert Configurations button to add new parametrization as many time as needed
3 examples of parametrization
for reproducing the default one change the following item Enter multiple linear regression by Single linear regression
for adding a new method fully automatics with canyon B - don’t change default item value
for adding a new method using your own choices, changes each item by your selection :
Bypass : The user defines P and chooses P below ; Enter 1000 (dbar) just below
Enter multiple linear regression : N corresponds to the number of breakpoints.
reference method : Climatology / WOA / annual (be sure you have added WOA harmonized climatology in Tool parameters/input reference data section)
Now more than one calibration method parametrization are ready to be tested.
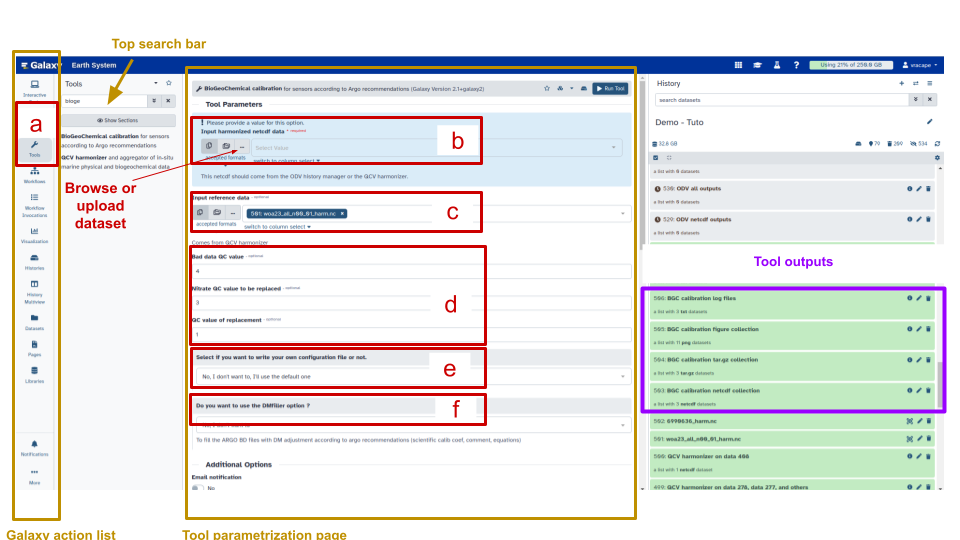
Figure 7:Biogeochemical calibration tool parametrization on Galaxy
(optional for argo floats) The tool gives the possibility to fill directly original argo nc files with DM information (coefficient, equation, comment, dm operator …) using DM filler tools from C. Schmechtig. For that, in the section Do you want to use DMfiller option (see
fin the Figure 7), change to Yes, I want to use it. Then, fill sections :Input original raw netcdf data with the dataset collection 4903881 built at the beginning of the work (Manage your data). This collection includes indeed all original argo nc files useful for reporting DM information
Input csv files with the csv created by
odv history managertool.
for the next sections, report all information that are mandatories regarding the
institution managing your ago data set
BGC contact point
BGC DM operator for this action
Click on Run
At the end of the process, the tool outputs are distributed by Galaxy in 3 collections:
One for NetCDF files, called BGC calibration netcdf collection
One for figures files, called BGC calibration figure collection
One for log files, called BGC calibration log files
If your are a DM Argo operator and activate DM filler option, DM filler outputs are also distributed in a 4rd galaxy collection called BGC calibration tar.gz collection
All of these are now available (green color) in the History section (Figure 7) and ready for comparison and validation but before,
Check the tool logs (YYYY-MM-DDTHHMM_galaxy_odv-calibration-methods_nitrate_c) to be sure that everythink is ajdusted and reported in the ARGO BD files (if DMfiller is activated) by clicking on the “eye” icon on the right of the file. If you encounter issues, make sure you respect all the instruction. If you still don’t find why it does not work, send an email to the contact point.
Validate your data
We suggest to compare your adjustement with ODV for validating one of the parametrization tested. For that,
Repeat Step1 of Qualify your data and create the ODV collection including all NetCDF creating during the Calibrate your data phase.
Repeat Step2 of Qualify your data without adding view
ODV will open with the new collection for validation. See How to use ODV if needed
add external dataset for comparison into your History following Manage your data section
Repeat Step2 of Qualify your data :
without automatic load
by selecting The data you are unsing are NetCDF or tabular text files at the question *Select if you are unsing a ODV collection in a zip folder or if you have your own raw data and add your collection created by step1 + the external collection
without adding view
ODV will open with its home page.
follow the instructions of ODV is open with its home page. as many time as you have datasets. From the second time, ODV will ask a metadata and variables mapping. Follow instructions and import variables of interest.
ODV is now ready for the comparison. See How to use ODV if needed